
Easy to Make Dinosaur Themed Birthday Cake
Everything Dinosaur team members get sent in lots of emails about dinosaur party food. We are happy to send out suggestions and provide advice, our staff like to offer advice on healthy treats such as fruit and vegetable based snacks, but then there comes the problem of the centre piece – the birthday cake itself. Not to worry, here is a simple and easy to follow recipe to make a sponge cake shaped like a meat-eating dinosaur.
Dinosaur Birthday Cake
For dinosaur models and toys check out Everything Dinosaur’s huge range: Dinosaur Themed Toys and Gifts.
A Recipe for a Super Dinosaur Birthday Cake

Simple to make dinosaur birthday cake. Picture credit: Everything Dinosaur.
Picture credit: Everything Dinosaur
Ingredients
As for decorating your dinosaur, you can use anything you like, so be imaginative and we are sure the budding young palaeontologist in the household would be happy to advise and help.
Method
1. Grease two large 20 cm x 30cm (8 inch x 12 inch), baking trays. In a mixing bowl, cream butter and caster sugar together until pale and creamy. Beat eggs in a jug then add them to mixture (a little at a time, beating as you go).
2. Add a quarter of the flour to the mixture, dropping it through the sieve again from a height above the bowl (helps make the sponges light and airy). Gently fold in the flour using a metal spoon. Repeat this process until all the flour is folded in. You should have a mixture that will drop off a spoon easily when the spoon is tapped against the side of the bowl, if the consistency is not right add a tablespoon of hot water.
3. Divide the mixture between the two tins, then place them on the middle shelf of a pre-warmed oven at 170°C / 325°F (Gas mark 3) for 25-30 minutes or until they are pale golden in colour. Remove from the oven and wait a minute then loosen them round the edges with a palette knife turn them out onto a wire cooling tray. Let the sponges cool completely before cutting and decorating.
The Sponge Cake and the Dinosaur Template
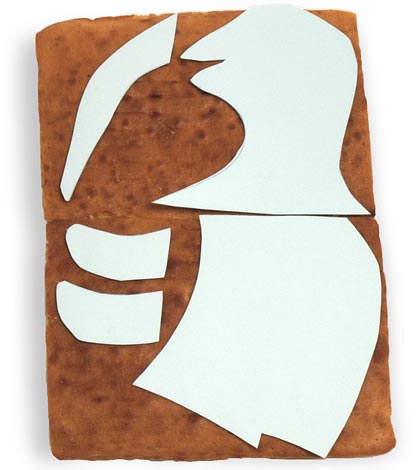
Ready to cut out the dinosaur shapes using the template. Picture credit: Everything Dinosaur.
Picture credit: Everything Dinosaur
Create your own dinosaur template (see picture above for help), make sure you create your template using quite stiff card, as this makes cutting out the sponge shapes using a knife easier. The sponge can then be divided up to make the various parts of the dinosaur. Do not worry about the joins, they will be covered up by the icing and the decorations. Remember to leave the sponge for a while to cool before attempting to cut out your templates.
Everything Dinosaur is a UK-based supplier of dinosaur and prehistoric animal themed models, toys and merchandise, check-out our website: Visit Everything Dinosaur.


Leave A Comment